Showing posts with label upcycling. Show all posts

Friday, February 24, 2012

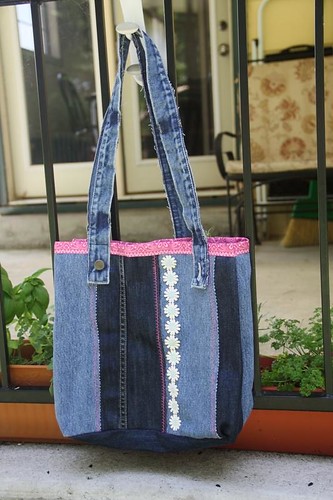
2 Upcycled Jean Purses and a Fairy Door

Pin from Pinterest

My version.

I saw this denim purse on Pinterest and had to make it! I loved the concept - up-cycling - turning something old into something new. My sister in law's birthday was around the corner so I made one for her. I used stencils, some fabric paint and some fun stitching on my machine. She really liked the purse and uses it often! Then, for Christmas I thought each of the girls would love one. The pictures below are the front and back of Dakota's purse. It's a modified version of original. On her purse there are beads, buttons, Disney princess ribbon, stenciling etc. Time did get the best of me and I was unable to finish the purses of the other girls. Once they are complete I will be sure to post them too.


When I saw this fairy door on Pinterest I immediately thought of my sister in law Mary. She loves faries and other whimsical type things. I knew I had to also make this for her for her Birthday. Go to Pinterest and see all the things that come up for fairy doors. There are a lot of great idea out of there.

In the picture below is my own version of the fairy door. I went outside and pulled bark off some chopped wood, found some branches that I could cut to size and in half. I had the fake moss from a previous project. I got the hinges from Pat Catans. The door base is Popsicle sticks that I glued together and stained. The Fairy stone is a fake pearl that I glued to the center and used black stickles over some puffed liquid applique. I really like the outcome - so did Mary!!

Pin It

Thursday, February 23, 2012

Poptab purse

This pop tab purse is what I made my niece for Christmas! It's a very unique and trendy gift for anyone. Madelyn has requested that I make her one and I have someone else wanting to pay me to make her one! These are a lot of fun and can test your patience at times. This particular purse is over 700 tabs. the front panel is 5 rows, the back panel and flap is 9 rows, the sides are 2 rows and then the shoulder strap.

You'll first want to start with a huge stash of washed pop tabs!! I stress this - WASH them before hand it will make it a much cleaner, smoother process.

Next your need some Sharn aka Shirt yarn - made from jersey knit t shirts in your preferred color. There are also many other things that can be made with sharn; check out pinterest to see all the things that are made with it.

Second you need to follow this basic weaving pattern for the pop tabs. I alternated two colors of sharn for this.

After all of your pieces are made then you sew them together. I used a thin yarn, I would not use it again. I would consider some sort of cording that would coordinate with the colors of the sharn.

Once you have completed putting the purse together, you are able to pick some sort of closure, I used a loop made of sharn and a black button.

For my first attempt - I was pleased, I can not wait to tackle another tab project!

Pin It

Monday, February 20, 2012

DIY Crayons

Sorting and Peeling the crayons

The crayons chopped and separated
I LOVE Crayons! My girls had a gallon sized ice cream bucket full of crayons. Many were from when I used crayons - so nearly 15+ yrs old. We had all sorts of colors - mainly Crayola. As you can see in the above photos it was a process - shorting, peeling papers, chopping and bagging the individual colors. Then we put broken crayon pieces in the little compartments. Each of the girls picked color combos...it was fun. 
I did this project because they had a lot of crayons - many broken and I found 4-5 brand new boxes of crayons so I thought it was perfect to use the older crayons for a fun project. (*side note* Brooke had decided to break 90% of those new crayons - so I am looking for a good price on crayons....probably when the back to school sales start.
Melting Crayons in a silicon form

Bake at 265 degrees for about 6-8 minutes. Be careful with the silicon forms - or use a cookie sheet underneath. It is hard to remove the form from the oven without the possibility of spilling the crayon wax everywhere. I got the directions from here. (There are a lot of other fun things on there to make at home for your kiddos.)
Here are a few of our finished crayons that we made. Some of our color combos were red, white and blue, orange, purple and green, brown and cream, red, yellow and orange, white, red and gray and the last one is pinks and reds with a few spots of gold and gray...they slipped in there. I have a TON of crayon pieces left. So, I think I will make more - I have a cute snowflake mold that would make some fun shaped crayons! When I make those; I'll be sure to post them!Pin It

Wednesday, November 09, 2011

Candy Wrappers turned Pencil Pouch

The last project I did on my Sunday Craftday was this candy wrapper pencil pouch, also another Pin from pinterest. from Punkin Patterns
I followed the directions from the above mentioned blog. I decided to leave the opening at the bottom of the candy wrapper covers - I will try a different version and use different thred for the next time I do this. I call the one below my prototype. I really like it but I need to figure a few things out with it. I did use bigger candy bags then the ones from the blog, but that is not an issue. I think you could really use any thing in any size that you'd like. I just want to make sure it looks more 'professional'. All in all I am pleased and this one below was ment for Brooke as she loves skittles. I may end up making another for her, or work on this one some more to fix the bottom seam.  (sorry for the unedited photos - they were snapped quickly and I am not thinking I should have put it in my white box that I typically use for photos). 

Tuesday, November 08, 2011

Upcycled Apron

Also on my crafting day this past Sunday I made another item that I pinned on Pinterest. It is an upcycled Apron. Here is my visual from A girl and a glue gun

I dug out my Thrift store finds / Hand me down pile and found a pair of jeans that would not fit anyone in the house. Some scrap fabric (that I got off freecycle) and my sewing stuff. I followed the directions on the above blog and wella - my new apron below:
This one will be for cooking. I am planning to make another one with on of hubby's jeans and use the bigger pockets to make a craft/painters smock. My sister-n-law and I are also planning to make some seasonal aprons as well. They are so simple and very thick...if you ever watch me cook/craft etc I am a total mess...and I ruin a lot of clothing :) 

Monday, November 07, 2011

New Ironing Table

Good morning! I am so grateful for the people in my community. I use freecycle to look for things that we may need/want before we go out and buy it. It helps keep the landfills less full etc. I am also addicted to this new website to me -www.Pinterest.com its like a virtual google with a story board feel. I can find things I like and file them under the board that I like and they make great reference points for me!! 

So - because of Pinterest I have a TON and I mean a TON of ideas brewing in my head. Before I go to the store and buy what items I do not already have - I look on freecycle. In the last week I received wool to make felt, beads, buttons, ribbon, Christmas decor, glass bottles etc. I am just blessed by the people in my community.

I got inspired - and got my Art room cleaned up and yesterday I got started on my projects. 

The first one I got from this Pin from Texas Freckles


I saw this picture (didn't think I needed the directions) and pulled out the following supplies: the cover and foam from my ironing board that just was not working for me (I would start to put pressure on it and it would collapse) I also got out some thread, elastic and pins. 

I sat there, it was early and I was not about to fight with the elastic and adding a trim to slid the elastic thru etc. I did not want the headache. So I went back to the above site and was directed to Oh, Fransson! A TV  tray press board. She used staples - low and behold - with I had the wrong staples or the gun was jammed...so I turned on the hot glue gun - and set up me table, foam and fabric and glued that sucker on!
Here is my lovely press board! And it works great for my projects!